
Yes, Now I am an official blogger. I have started a new blog called MakeMeGeek. I like to thank you all for supporting this blog. You can follow my new blog if you like to. Thanks again and good bye.
Yes, Now I am an official blogger. I have started a new blog called MakeMeGeek. I like to thank you all for supporting this blog. You can follow my new blog if you like to. Thanks again and good bye.
UIStepper was introduced in iOS 5.0.It provides an option for the user to increment or decrement values.Now we are going to create a project with UIStepper which displays increment or decrement values.


self.stepperOutlet.minimumValue = 0;
self.stepperOutlet.maximumValue = 1000;
self.stepperOutlet.stepValue = 10;
self.stepperOutlet.autorepeat = YES;
self.stepperOutlet.continuous = YES;
self.stepperLabel.text = [NSString stringWithFormat:@"Value:%d",0];
What’s this,
Minimum Value:It is the minimum value the UIStepper will start from.Here we our minimum value is ‘0‘.
Maximum Value:It is the maximum value of the UIStepper can reach.Here our maximum value is ‘1000‘.
Step Value:It is the value by which UIStepper will increment or decrement each time when we press ‘+‘ or ‘–‘ button.
Autorepeat:If ‘YES’ the UIStepper will continuously increment or decrement the value when the ‘+‘ or ‘–‘ button is press and hold.
Continuous:If ‘YES’ the value change events are send immediately when the user clicks ‘+‘ or ‘–‘ button.If ‘NO’ the value changing events are send when the user interaction ends.
int stepperIntValue = self.stepperOutlet.value;

self.stepperLabel.text = [NSString stringWithFormat:@"Value:%d",stepperIntValue];
Congratulation!

A Pagecontrol presents user with a set of horizontal dots representing pages.The current page is presented as white dot.We can navigate to the next or previous pages.In this example we will create a page control with displaying page number.


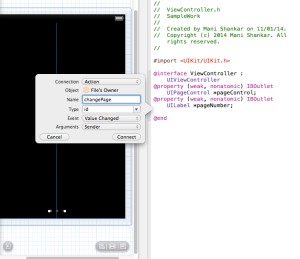
Now add this lines inside the changePage method ,
self.pageNumber.text = [NSString stringWithFormat:@"%i", ([self.pageControl currentPage]+1)];
Congratulation ! Finally…

The communication between the classes,variables,methods and constructors are defined by the Access Modifiers.There are types in Access Modifiers.They are,

Public:
The members with public access modifier are accessible by any class or member of class in java.These public variables,methods,classes and constructors are visible to all classes in java.
Protected:
The protected variables and methods cannot be inherited by interface and classes.It cannot be used as modifiers to methods and variables inside the interface.These members can be accessed by the sub-class of different package and classes of same package.
Private:
The private variables and methods cannot be inherited by interface and classes.It cannot be used as modifiers to methods and variables inside the interface Private members are only accessible inside the class in which it is declared.
Note: Best strategy to access the private members is by using Getter and Setter methods.It is called as Encapsulation
Default:
When no access modifier is specified to a member,it will be considered as default access modifier member.The member with default access modifier can be accessed by Sub-Class of Same package or Classes of Same Package but not outside the package.
Example Code 1 – Sub Class within Same Package
package p1;

public class ModifierSetter

{

public int a=100;

protected int b=200;

private int c=300;

int d=10;
public void setA(int a)
{
this.a = a;
}
public int getA()
{
return a;
}
private void setC(int c)
{
this.c = c;
}
private int getC()
{
return c;
}
protected void setB(int b)
{
this.b = b;
}
protected int getB()
{
return b;
}
void setD(int d)
{
this.d = d;
}
int getD()
{
return d;
}
}
package p1;

public class SubClassinSamePackage extends ModifierSetter

{

public static void main(String args[])

{

ModifierSetter obj = new ModifierSetter();
System.out.println("Value of A:"+obj.a);
System.out.println("Value of B:"+obj.b);
System.out.println("Value of D:"+obj.d);
obj.setA(10);
obj.setB(20);
obj.setD(40);
System.out.println("Value of A after Set:"+obj.getA());
System.out.println("Value of B after Set:"+obj.getB());
System.out.println("Value of D after Set:"+obj.getD());
/*
Below Lines raise error as we are trying to access private members
*/
//System.out.println("Value of C:"+obj.c);
//obj.setC(30);
//System.out.println("Value of C after Set:"+obj.getC());
}
}
Output:
Value of A:100

Value of B:200

Value of D:10

Value of A after Set:10

Value of B after Set:20

Value of D after Set:40
Example Code 2 – Sub Class in Different Package
package p1;
public class ModifierSetter
{
public int a=100;
protected int b=200;
private int c=300;
int d=10;
public void setA(int a)
{
this.a = a;
}
public int getA()
{
return a;
}
private void setC(int c)
{
this.c = c;
}
private int getC()
{
return c;
}
protected void setB(int b)
{
this.b = b;
}
protected int getB()
{
return b;
}
void setD(int d)
{
this.d = d;
}
int getD()
{
return d;
}
}
package p1;

public class SubClassinDifferentPacakage

{

public static void main(String args[])

{

ModifierSetter obj = new ModifierSetter();
System.out.println("Value of A:"+obj.a);
System.out.println("Value of B:"+obj.b);
System.out.println("Value of D:"+obj.d);
obj.setA(10);
obj.setB(20);
obj.setD(40);
System.out.println("Value of A after Set:"+obj.getA());
System.out.println("Value of B after Set:"+obj.getB());
System.out.println("Value of D after Set:"+obj.getD());
/*
* Below Lines raise error as we are trying to access private members
//System.out.println("Value of C:"+obj.c);
//obj.setC(30);
//System.out.println("Value of C after Set:"+obj.getC());
}
}
Output:
Value of A:100

Value of B:200

Value of D:10

Value of A after Set:10

Value of B after Set:20

Value of D after Set:40
Example Code 3 – Super Class from Different Pacakage
package p1;

public class ModifierSetter

{

public int a=100;

protected int b=200;

private int c=300;

int d=10;
public void setA(int a)
{
this.a = a;
}
public int getA()
{
return a;
}
private void setC(int c)
{
this.c = c;
}
private int getC()
{
return c;
}
protected void setB(int b)
{
this.b = b;
}
protected int getB()
{
return b;
}
void setD(int d)
{
this.d = d;
}
int getD()
{
return d;
}
}
package p2;

import p1.ModifierSetter;

public class ClassInDifferentPackage

{

public static void main(String args[])

{

ModifierSetter obj = new ModifierSetter();

System.out.println("Value of A:"+obj.a);

obj.setA(10);
/*
* Below Lines raise error(private and protected members are not accessible by a Super class from different package)
*/
// System.out.println("Value of b:"+obj.b);
// System.out.println("Value of D:"+obj.d);
// System.out.println("Value of c:"+obj.c);
// obj.setB(20);
// obj.setD(40);
// obj.setC(30);
// System.out.println("Value of c after Set:"+obj.getC());
// System.out.println("Value of B after Set:"+obj.getB());
// System.out.println("Value of D after Set:"+obj.getD());
}
}
Output:
Value of A:100

Yes! Google has just removed a privacy policy feature from its Android mobile software.
You need their product! Then give your information! Its a Business.
Android mobile users should give their information in order to use some applications.This will be implemented from Android 4.4.2.
Android 4.4.2 has been released recently,the latest version of the worlds popular mobile operating system.
According to Android – ‘For the time being, users will need to chose between either privacy or security on the Android devices, but not both’
The founder of Distinc.tt planned to have an gay social app which is not centered towards Sex.It is an fully packed social app with features like event ticket,location,feed etc.
 How hard they try, gay community is considered as a torsos relationship.May be it may change when they are more in number.
Grindr is the best app for gays? Probably no.
Gays have a taste and unique style. what about it? They deserve more.There are number of killer apps released in the stores everyday.But the gay community hasn’t offered its full bloom of its tasteful side.
Fine urban studies theorist Richard Florida said, there will be upcoming gay cities when their numbers increase.
So they’ve created Distinc.tt. This, they claim, is “the only gay social app approved by the iTunes store for 12-year-olds and older.”
So what about Distinc.tt? It is not about sex centering?
Actually Distinc.tt build this app by using real-time collective knowledge about connecting trendsetting crowds,restaurants,travelers to the places and people with distinct interest.
CEO Michael Belkin told me that this is very different from, say, Grindr: “If you go on Grindr, people change their headline sometimes to ‘Visiting tonight, does anyone know the best place to go out?'”
Anyway the gay community got something they finally deserve.

Reference – http://news.cnet.com
ProgressView is used to show progress of work.For example downloading,retrieving values from web service.
Create the UIProgressView by setting referencing outlets with getter and setter property.
@property (strong, nonatomic) IBOutlet UIProgressView *progressObject;
@synthesize progressObject;
Create a button with method named,
- (IBAction)startProgress:(id)sender;
Implement the methods in the .m file,
static float progress = 0.0f;
-(void)showWithProgress
{
progress = 0.0f;
progressObject.progress = progress;
if(progressObject.progress<1)
[self performSelector:@selector(increaseProgress) withObject:nil afterDelay:0.3];
}
-(void)increaseProgress {
progress+=0.1f;
progressObject.progress = progress;
if(progress < 1.0f)
[self performSelector:@selector(increaseProgress) withObject:nil afterDelay:0.3];
}
Now just call these methods like this,
- (IBAction)startProgress:(id)sender
{
[self showWithProgress];
}
OUTPUT:

An image to use for the portion of the progress bar that is filled.
@property(nonatomic, retain) UIImage *progressImageThe color shown for the portion of the progress bar that is filled.
@property(nonatomic, retain) UIColor *progressTintColorThe current graphical style of the receiver.
@property(nonatomic) UIProgressViewStyle progressViewStyleAn image to use for the portion of the track that is not filled.
@property(nonatomic, retain) UIImage *trackImageThe color shown for the portion of the progress bar that is not filled.
@property(nonatomic, retain) UIColor *trackTintColorUIActivityIndicatorView is used to show that some long process is processing in background.It can be implemented programatically and using IBOutlet.
In this tutorial we are going to create a UIActivityIndicatorView programatically with start and stop animations.Lets get started,
Step 1: Create a new project in Xcode.
Step 2: Set property for UIActivityIndicatorView in .h file and set @synthesis in .m file.
.h file:
@property (nonatomic,retain) UIActivityIndicatorView *activityIndicatorObject;
.m file:
@synthesis activityIndicatorObject;
Step 3: Now Initialize UIActivityIndicatorView object and set position.
// Initialize ActivityIndicator object
activityIndicatorObject = [[UIActivityIndicatorView alloc] initWithActivityIndicatorStyle:UIActivityIndicatorViewStyleWhiteLarge];
// Set Center Position for ActivityIndicator
activityIndicatorObject.center = CGPointMake(150, 150);
// Add ActivityIndicator to your view
[self.view addSubview:activityIndicatorObject];
Step 4: Add two buttons in xib and set Action as stopAnimating and startAnimating.These methods are used to start and stop ActivityIndicator.
- (IBAction)startAnimating:(id)sender
{
[activityIndicatorObject startAnimating];
}
- (IBAction)stopAnimating:(id)sender
{
[activityIndicatorObject stopAnimating];
}

Step 5: Now Run the project.You are Done!!!

UISwitch is an component which resembles the electronic switch with animation.We can change the Switch state by manually or programatically.
In this tutorial we are going to change the state of the UISwitch programatically with suitable changing Label text.Lets have a look at this,
Step 1: Create a new ‘Single view’ project in Xcode.
Step 2: Drag and drop components like UISwitch,UILabel and UIButton.Arrange them as shown below,

Step 3: Right click over the ‘UISwitch’ component.Now drag and drop in the .h file as shown below.Give a name to your UISwitch and UILabel component which will be referenced later.Set method name for the UISwitch and Button as we did before.

@property (weak, nonatomic) IBOutlet UISwitch *switchObject;
@property (weak, nonatomic) IBOutlet UILabel *switchLabel;
- (IBAction)toggleAction:(id)sender;
- (IBAction)switchAction:(id)sender;
Step 4: Include this method in your .m file.
- (IBAction)toggleAction:(id)sender {
if(switchObject.on)
{
[switchObject setOn:NO animated:YES];
switchLabel.text = @"Disabled";
}
else
{
[switchObject setOn:YES animated:YES];
switchLabel.text = @"Enabled";
}
}
In this method the UISwitch state and label value changes when user pressed the ‘Toggle’ button.
Step 5:Include this method in your .m file.
- (IBAction)switchAction:(id)sender {
if(switchObject.on)
{
switchLabel.text = @"Enabled";
}
else
{
switchLabel.text = @"Disabled";
}
}
In this method the label value changes when user pressed the UISwitch.
Step 6: Now Run the project.You are done…
After the installation, now we gonna have a look at ‘HelloWorld‘ program.We are not going to implement any code here.When we create a new project in cocos2d, it automatically builds some code in it.
1.Select File–>New–>Project.
2.A window appears as shown below.
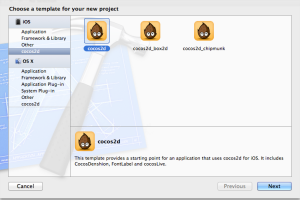
3.Select ‘Cocos2d’ and click next.
4.Just run the project.
Output:

